Wednesday 21 April 2010

FREE BRUSH


This is a new brush I've just uploaded to the website that is a free download for anybody who wants to us it. It's from a very old book with the words 'Journal' written on the front. I thought it would make a great brush for anybody but especially scapbookers who would find this very useful for any scapbooking projects. If you do use it please show me anything you did with it.
To download it just go to this link by CLICKING HERE

Sunday 18 April 2010

CREATE THE LOMO LOOK


This is our new photoshop tutorial teaching people how to create the lomo (lomography) look. Have a watch. And  don't forget to visit the website www.photoshopforartists.com to view our other photoshop video tutorials

Saturday 17 April 2010

INTERVIEW WITH JOSE GABRIEL


The interview with Jose Gabriel has just been posted on the website www.photoshopforartists.com He's a vert talented digital artist with some great things to say so make sure you read what he has to say.

Sunday 4 April 2010

PINK BLOSSOM


Blossom
Originally uploaded by photoshopforartists

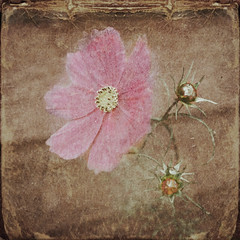
It's the spring so there is a glut of images with blossom in them on flickr. So as not to disappoint anyone I'd thought I'd give my take on spring with a blossom picture with some textured layers applied to give it a bit of an arty edge.

I used textures from my BEST TEXTURES 1 SET and started with the very versatile:
DRAIN GREY - vivid light - 56% then
MUD DUST - color dodge - 23%
FUZZY LINEN - color burn - 100%
WASHME VAIL - color burn - 100%
And that was it for the textures.

On top of these I added an curves adjustment layer and painted with black over the middle flower as that retained some detail after the added contrast from the curves.

Finally, I duplicated the background and put it on the top of the stack and applied a soft light blending mode at 100% just to bring out some more detail.

That's it. Hope you like it.

You can buy the textures used in this picture by CLICKING HERE

Thursday 1 April 2010

PINK FLOWER


Pink flower
Originally uploaded by photoshopforartists

If you take a look at the before picture of this finished image you will see a really bright, over-the-top pink and red picture. I wanted to try and get a really faded, old look and below is how I did it.

Do take a look at the screen shot of the photoshop layers and it does look like a complicated job but in fact there are only two textures used and they are from my BEST TEXTURES 1 set.

The first texture is SAHARA MIST - vivid light - 82%
Then SMOKEY BOOK - exclusion - 88%
I then coped the smokey book layer again with an adjustment layer to burn in the edges.
After that I copied the background layer moved it up the stack and with an adjustment layer brought out some of the pink flower.
I finished it off with a few curves adjustment layers and a hue/saturation layer to remove a lot of the colour.

You can buy the textures used in this picture by CLICKING HERE