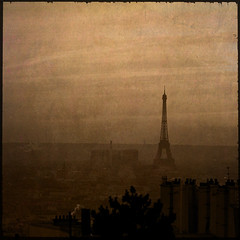
Friday 26 February 2010

PARIS


Paris
Originally uploaded by www.photoshopforartists.com

A book publisher wanted a shot of Paris and this was the picture I submitted with the added textures from my BEST TEXTURES 1 AND 2 sets. There is quite a big difference from the original shot (see below) and it is quite amazing what can be done with some good textures. Follow below to how I did it.

I started off with CHURCH RED at colour blend mode at opacity of 88%.

Next was CHERRY SMOKE at multiply at 57%.

Then PLASTER DUST from my BEST TEXTURES 2 set using soft light at 41% opacity.

Lastly I used BOOKWORM JACKET using hue at 100%.

And to finish off the edges I added BORDER 7 from my new black borders set that you can see here as well as on the photoshopforartists.com website.

BOAT ON THE BEACH


Boat on beach
Originally uploaded by www.photoshopforartists.com

I photographed this boat on the beach late one summer's evening before spending the night camping on the beach.

Like all of my textured pictures so far I've got these textures from my BEST TEXTURES 1 set.

Began with MUD DUST using the screen blending mode at 100% opacity.

Next was WASHME VAIL with soft light at 58%.

Then CHURCH RED and the hard light mode at 28%.

For the last two textures I added a layer mask and brushed out the boat so it showed through a bit more.

The last layer was drain grey with soft light at 26%.

And lastly finished it off with a curves adjustment layer just to darken down the edges to create a vignette.

That's it.

Monday 22 February 2010

RED ORCHIDS


Orchids
Originally uploaded by www.photoshopforartists.com

I took this shot at a wedding and this was one of the table decorations. I really liked the green red pink contrast - just works so well together.
Adding textures to this image was quite challenging because it is quite a busy picture and some textures don't show through so well but with 4 textures from my BEST TEXTURES 1 set it seemed to come together.

I started by copying the background layer and blurred that. To it I added an adjustment layer to unblur the main orchids in the middle but leaving the background orchids blurred.

To that I added the first texture layer which was WEATHERED BLACK with a screen blend mode and set it to 63% opacity.
To that placed MISTY SLAB on top with 100% opacity and soft light screen mode.
Then DRAIN GREY -- linear light - at 22%.

I stopped the textures and added curves layer to increase the contrast then a hue/saturation layer to calm the red down a bit and finally something was still missing so added WASHME VAIL to it at overlay blending mode at 30% and that's it.

TREES IN THE WOODS


Trees in the wood
Originally uploaded by www.photoshopforartists.com

I took this picture in Bordeaux, France on a cold February afternoon while on assignment for a magazine. The French do the regimented line of trees so well that I just couldn't pass it without pulling over a taking a picture. The difficulty was standing in the right place to get the feel of the symmetry of straight lines.

Anyway, I thought it would make a good texture picture but it took a lot longer to do that I thought it would. Don't know why but just couldn't get it to look like I wanted.

The textures for this picture all came from my BEST TEXTURES 1 set so take a look at them.

I started with GREEN GOO which is great on all pictures. I gave that a hard light blending mode at 79% opacity.
From where copied and pasted COCONUT TLE using color dodge at 48% and finally went for OUTER GALAZY at soft light dialling down the opacity to 53%

On top of these I added a few adjustment layer to boost the greens, increase the contrast and desaturate the image a bit.

Hope you like it.

Thursday 18 February 2010

POPPIES


Poppies
Originally uploaded by www.photoshopforartists.com

This shot was taken in a field in France on a job for a magazine and I thought it would make a great picture to add a texture to.
Before I started to add any textures I need to tweek the picture a bit. I first over sharpened the poppies to make them stand out and give the picture a 3D look. On top of that I boosted the red and yellows with an adjustment layer and then I added another layer filled it with blue applied a gradient on the layer mask to make just the sky blue. Now for the textures.
Started off with WASHME VAIL in overlay blend mode at 100%. To this I added a clipped hue/saturation layer and blued up the sky some more.
Next up was OUTER GALAZY using soft light at 100% opacity again.
Lastly DRAIN GREY on hard light at 100%. Because this texture showed through quite strongly I added an mask and brushed out the middle.
To finish it off a slight 's' curve to boost the contrast some more.

If you want to see the video tutorial of how this picture was put together using the textures please CLICK HERE

Tuesday 16 February 2010

Buddha


Buddha
Originally uploaded by www.photoshopforartists.com

This shot of a buddha's head which I photographed in Singapore needed quite a few texture layers to get this look. These textures are all from my BEST TEXTURES 1 set. Nothing too complicated but there is 5 layers.
They start with COCONUT TILE using vivid light blending mode at 26%.
Next was GREEN DUST with colour dodge at 48%.
On top was then GREEN GOO using vivid light at 48%.
I then went for MISTA SLAB in overlay mode at 100% plus OUTER GALAZY at 100%. The last two textures had an adustment layer to cut down a bit of the green in the buddha's face and torso.
And lastly a hue saturation layer at the top just to remove more green from the face area.

If you want to buy the textures used above please CLICK HERE

BEACH HUTS


beach huts1
Originally uploaded by www.photoshopforartists.com

This is a neat row of beach huts shot on a beach in Belgium. I used textures from my BEST TEXTURES 1 set. And this is what I used:
SAHARA MIST with overlay blend mode at opacity of 66% with an adjustment layer added to it with the middle brushed away to reveal more of the original layer.
Next up was SILVER PENDANT with soft light mode at 37% opacity.
Over the top of these I added BOOKWORM JACKET with soft light again at 14%
And lastly FUZZY LINEN with overlay at 50%.
It need a coupe of adjustment layers. One was a curves to increase the contrast and the next was a hue saturation to bring down the colours a bit. I then used a border brush and added that to the sides.

If you want to buy the textures used above please CLICK HERE

PINK FAIRY CAKE


pink fairy cake
Originally uploaded by www.photoshopforartists.com

Being valentines day the mrs and the two kids bought me six fairy cakes and this one with the pink hearts on top I thought would be an appropriate theme for today.
These textures were all from my BEST TEXTURES 1 set.
I started over with MISTY SLAB at overlay mode at 61%.
Next up was CHERRY SMOKE in screen blending mode at 100%.
And lastly ANTIQUE BLUE with linear dodge at 22%
On top of these were three curves adjustment layers two of which had the edges burned in to give a little vignette and the third one was a general 's' curve adjustment to boost the contrast

If you want to buy the textures used above please CLICK HERE

RED UMBRELLA


Red Umbrella after
Originally uploaded by www.photoshopforartists.com

This red umbrella is vivid enough already but felt it was a bit too flat and could use some textures to make it more interesting so used four textures from the BEST TEXTURES 1 set. See below for the recipe:
Started with the OUTER GALAZY using linear light blend mode at 77% opacity.
Then moved on to SILVER PENDANT in overlay mode at 100%.
Followed by TEACHEST RED with vivid light at 35%
And lastly FUZZY LINEN with linear burn at only 16%
To the SILVER PENDANT layer I then added an adjustment layer and brushed out the centre which was just a little too dark. And that was it. Hope you enjoyed it.

If you want to buy the textures used above please CLICK HERE

Wednesday 10 February 2010

merry go round


Just uploaded this to the photoshopforartists flickr site as the latest picture to get my new set of textures applied to it. CLICK HERE to see how I did it.

NEW TEXTURES UPLOADED


Two new texture packs have been added to the website www.photoshopforartists.com Please go and check them out. You have the option to buy them and at only $25 for each set that works out at quite good value for money making each texture only $1 each. Or if you rather you could press this button to go and buy them. CLICK HERE FOR BEST TEXTURES 2 and CLICK HERE FOR BEST TEXTURES 1

Friday 5 February 2010

INTERVIEW WITH ELENA RAY


The interview with Elena Ray is now up. Her work is fantastic. She is inspired by nature and holistic things and this clearly show is her digital art. CLICK HERE to have a look.

Wednesday 3 February 2010

NEW ARTISTS OF THE MONTH


It's now February and we have some new artists of the month and they are all very talented digtial artists. Go to www.photoshopforartists.com and take a look.